Many issues with your robot vacuum often come from setup mistakes, not a broken device. Common errors include cluttered spaces, obstructed sensors, or poorly placed charging stations. Make sure your home has clear pathways, free of bulky objects, and that the station is in an open area facing your main cleaning zones. Keeping sensors clean and calibrating the robot helps too. If you want to avoid these pitfalls and keep your vacuum running smoothly, there’s more to learn below.
Key Takeaways
- Ensure the charging station is placed in an open, unobstructed area with enough clearance for smooth docking.
- Clear clutter and bulky objects from pathways and around the charging station to prevent navigation errors.
- Regularly clean and check sensors for obstructions or dirt that can impair mapping and movement.
- Properly calibrate the robot vacuum during initial setup to improve environment understanding.
- Face the charging station towards the main cleaning areas and avoid tight corners to facilitate easier docking.
Setting up your robot vacuum might seem straightforward, but making common mistakes can lead to poor cleaning performance or even damage. One of the most frequent issues new users encounter involves navigation errors. If your vacuum struggles to move smoothly around your home, it’s often because the initial setup didn’t account for space layout or obstacles. For example, placing thick rugs or cluttered areas in high-traffic zones can confuse the sensors, causing the vacuum to get stuck or miss spots. To avoid this, clear pathways and remove bulky objects before starting. Additionally, confirm that the sensors are clean and unobstructed so the robot can accurately map its environment. Properly calibrating your vacuum during setup helps it understand the layout, reducing navigation errors over time. Being aware of thermal behavior and sensor calibration techniques can also enhance its efficiency and longevity.
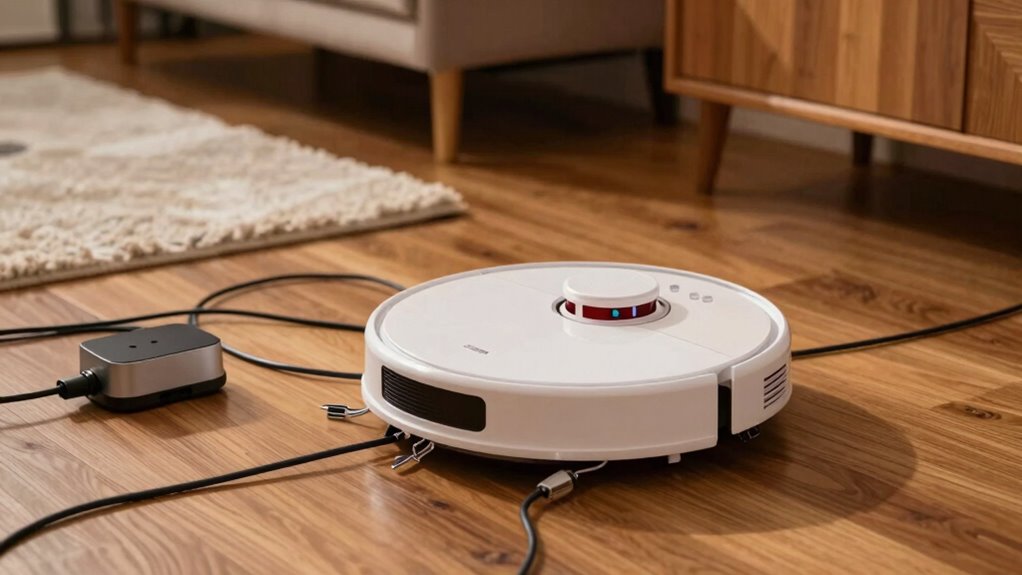
Another common mistake involves the placement of the charging station. Many people set it up too close to walls, furniture, or in cramped corners, which hampers the vacuum’s ability to dock properly. When the charging station isn’t easily accessible or is surrounded by obstacles, the robot struggles to find its way back, leading to incomplete cleaning cycles or repeated docking failures. To prevent this, position the station in an open area with at least a few inches of clearance on all sides. Make sure there are no objects blocking the way, and avoid placing it in high-traffic zones where the vacuum might encounter frequent disturbances. Proper placement ensures that your robot can dock and recharge efficiently, maintaining consistent cleaning performance.
Another point to consider is the orientation of the charging station. Some users don’t pay attention to the direction of the docking port, which can make the robot’s navigation more complicated. Position the station so that the robot approaches from a clear, unobstructed angle, ideally facing the open space towards the main cleaning area. This setup simplifies the docking process and minimizes navigation errors related to the charging station.

Mangodan Cloud Sectional Couch, Boneless Sofa for Living Room, Fluffy Comfy Couch with Deep Seat, Modular Sectional Sofa with L-Shaped Chaise, No Assembly Required, Dark Grey
Soft Corduroy Fabric: Upholstered in smooth, breathable corduroy, this Cloud Sectional Couch features an L-shaped chaise sofa design...
As an affiliate, we earn on qualifying purchases.
Frequently Asked Questions
How Often Should I Replace the Robot Vacuum’s Filter?
Did you know that most filters need replacing every 2-3 months? For effective filter maintenance, follow your vacuum’s replacement schedule, which varies by model and usage. Regularly checking and swapping out the filter ensures your vacuum works efficiently and prolongs its lifespan. Don’t wait until it’s visibly dirty—changing your filter on time keeps your home cleaner and your device performing at its best.
Can I Program My Robot Vacuum to Clean Multiple Rooms?
Yes, you can program your robot vacuum to clean multiple rooms using its room mapping and scheduling features. Set up the mapping to identify each room, then create a cleaning schedule that targets specific areas at different times. This way, your vacuum efficiently covers multiple rooms without manual intervention. Make sure your app or device supports these features, and you’ll enjoy seamless, automated cleaning across your home.
Is It Safe to Use a Robot Vacuum on Hardwood Floors?
Think of your hardwood floors as a delicate dance partner—using a robot vacuum is safe if you follow proper hardwood floor care. For robot vacuum safety, make certain your device has a soft brush or specialized settings for hardwood surfaces. Regularly clean the wheels and sensors, and avoid overly aggressive models. When used correctly, your robot vacuum effectively cleans without damaging your floors, making it a smart addition to your cleaning routine.
How Do I Reset My Robot Vacuum if It Gets Stuck?
If your robot vacuum gets stuck, you need to reset it to fix navigation issues. First, follow your model’s reset procedures—usually, you press and hold the power button or a specific reset button for a few seconds. This clears any glitches and restores proper navigation. After resetting, check for obstacles or tangled brushes that might cause it to get stuck again, ensuring smoother operation moving forward.
What Should I Do if My Robot Vacuum’s Battery Isn’T Charging?
If your robot vacuum’s battery isn’t charging, first check the power connectivity and guarantee the charging dock is plugged in securely. Clear any dust or debris from the charging contacts to improve battery maintenance. Make sure the vacuum is placed correctly on the dock, and try resetting the device. If it still doesn’t charge, consider replacing the battery or inspecting the power source for issues.

Korser 110" L-Shaped Modular Sectional Sofa with Chaise, Boneless Comfy Corduroy Fluffy Couch with Deep Seat and Side Pockets, Flexible Module Combination for Living Room, No Assembly, Side Pockets
Tool-Free Assembly & Ready to Use: Skip the hassle of traditional furniture—no tools, screws, or complicated instructions needed....
As an affiliate, we earn on qualifying purchases.
Conclusion
Most people don’t realize that a simple setup mistake can cut your robot vacuum’s efficiency by up to 30%. If your device isn’t cleaning well, check your placement, barriers, and app settings first. Nearly 60% of users miss these small tweaks, wasting time and energy. Fixing these common errors means your robot will work smarter, not harder, saving you money and frustration. Don’t let a setup slip-up hold back your cleaning power—just a quick check can make all the difference.
108” Modular Sectional Sofa, Cloud Sectional Couch with Deep Seat, Modern Modular L-Shape Sofa Couch with Chaise,Upholstered Boneless Couches for Living Room Bedroom (Black, Left Facing Chaise)
Multiple Package: Multiple packages may arrive separately. If you have any questions about your cloud couch sectional or...
As an affiliate, we earn on qualifying purchases.

Lifezone Queen Bed Frame with 2-Tier Storage Headboard, Metal Platform Bed Frame with 4 Storage Drawers, Built in Charging Station & LED, Noise-Free/Metal Support/No Box Spring Needed, Vintage Brown
【Storage Headboard with Charging Station】The headboard is equipped with a built-in charging station, including 2 AC Outlets, a...
As an affiliate, we earn on qualifying purchases.